

Do you remember the warmth of Care Bears? Their bright colors and kind messages brought joy to many. Now, you can bring that magic to your nails with Care Bear Nails. Each manicure becomes a celebration of fun and creativity, filled with bright colors and cute details.
This guide makes it easy to create cute, bold nail art. You’ll learn to paint tiny hearts, rainbows, and friendly motifs. It’s as joyful as holding your favorite Care Bear plushie.
Table of Contents: care bear nails
Key Takeaways: care bear nails
- Explore easy-to-use tools tailored for care bear nails.
- Master simple steps to craft vibrant, detailed nail art.
- Learn how to pick supplies that make designs pop.
- Avoid common mistakes with practical advice.
- Blend colors and patterns inspired by Care Bear themes.
What Are Care Bear Nails?
Care Bear Nails are a fun nail art style inspired by the 1980s Care Bear characters. They mix old-school charm with today’s trends, appealing to those who love playful diy nail ideas. Each manicure is a burst of color and happiness.
Origin and Inspiration
This trend comes from the colorful Care Bear plush toys and cartoons of the 1980s. Their bright colors and heartwarming stories inspire nail art. This includes:
- Retro-inspired color schemes from the original characters
- Social media trends showcasing fan-made designs
- DIY accessibility for at-home creativity
Key Characteristics of the Trend
| Feature | Description |
|---|---|
| Pastel Palette | Soft hues like cotton candy pink and sky blue dominate the base. |
| Glitter Accents | Fine glitter adds sparkle to belly badges or corner accents. |
| Cartoon Imagery | Hand-painted symbols like hearts or stars mimic the bears’ iconic belly patches. |
| Personal Touches | Add names, emojis, or favorite motifs to make each set unique. |
These elements turn nails into tiny canvases for expressing joy and creativity. Whether you’re replicating classic designs or inventing new ones, Care Bear Nails celebrate fun and self-expression.
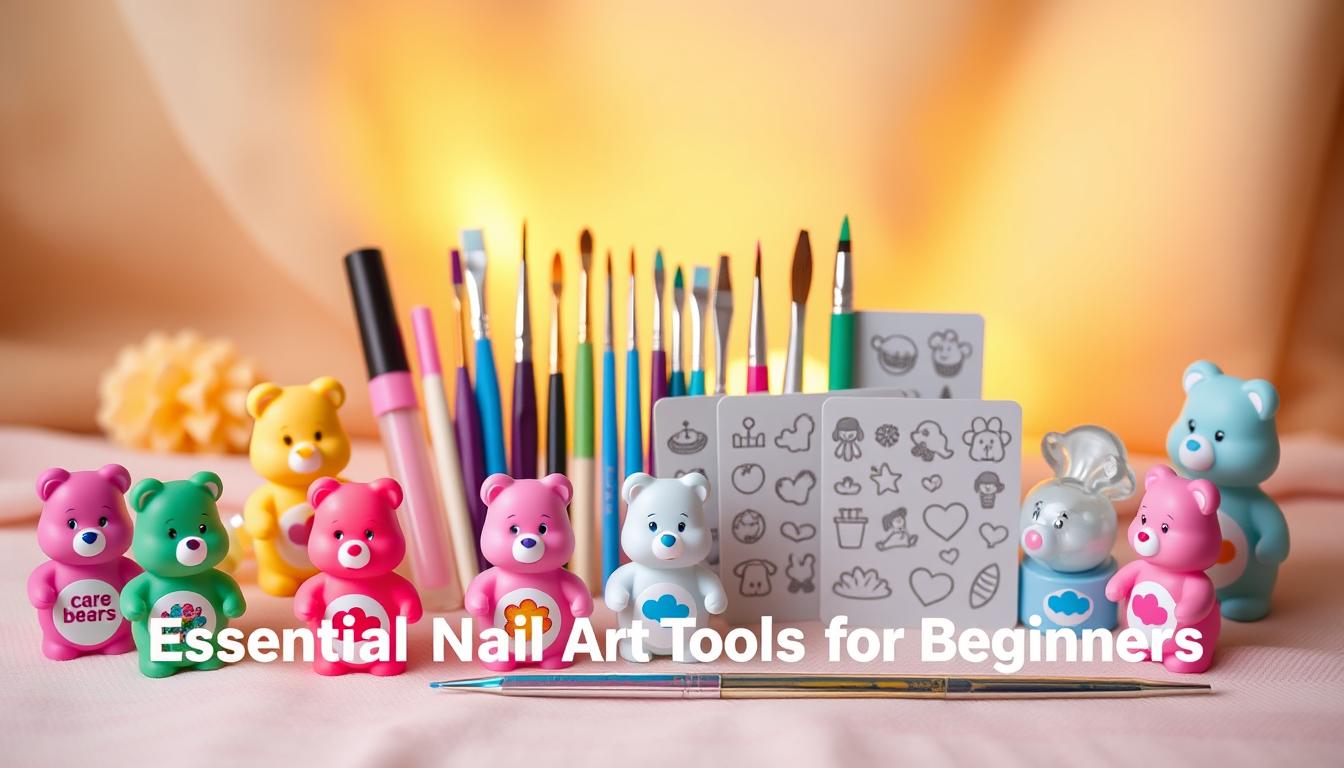
Essential Nail Art Tools for Beginners
Creating care bear inspired nails begins with the right tools. Before you start painting, get quality supplies for precision and ease. These basics make your designs colorful and cohesive.
Top Tool Features to Look For
- Brush Quality: Fine, flexible brushes (like those in Sally Hansen Art Deco Nail Polish) for detailed work.
- Stamping Kits: Precise plates and handles (e.g., Konad Pro Stamping Kit) for Care Bear symbols like hearts or stars.
- Base & Top Coats: Quick-drying formulas (try OPI Fast Dry Base Coat) to avoid smudges.
How to Choose the Right Products
Match tools to your skill level. For care bear inspired nails, choose tools with ergonomic grips. Look for starter kits with brushes, polishes, and guides.
Read reviews from beginners to find trusted brands. Always test products on a small area first. This ensures colors and textures match your vision.
Quality doesn’t have to be expensive. Affordable options like Wet n Wild Mega Mixx Polish have vibrant shades for Care Bear themes. Choose durable tools to save money in the long run.
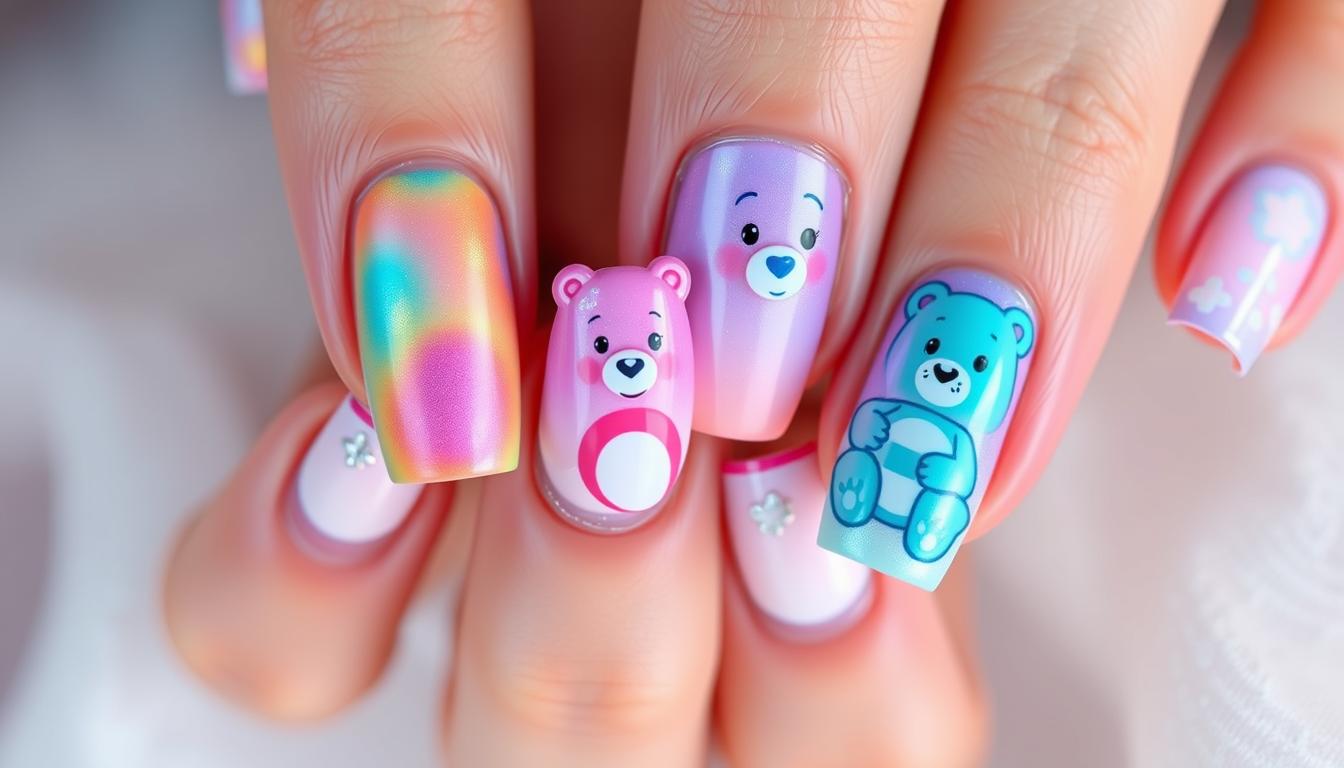
Innovative Care Bear Nails Designs
Stay ahead of the latest nail trends by mixing classic Care Bear designs with new ideas. Try soft gradients or bold accents to make your nails unique. These styles keep you in line with today’s nail trends.
- Gradient backgrounds: Layer pastel hues like cotton-candy pink or sky blue for a dreamy vibe.
- Metallic accents: Add foil strips or shimmer polish to highlight bear faces or hearts.
- 3D elements: Attach tiny rhinestones or resin charms for a tactile, whimsical touch.
Mix patterns like polka dots or stripes with Care Bear icons for a fun contrast. Use matte finishes for a modern look or glossy topcoats for a classic shine. Check out YouTube for step-by-step guides to keep your designs fresh. Your nails should show off your style while following today’s nail trends.
Beginner-Friendly Nail Techniques to Master the Trend
Learning Care Bear Nails is easy. Start with these simple steps to create polished designs at home:
- Apply a base coat to protect nails and ensure polish adheres evenly.
- Use a dotting tool to place small, consistent shapes—like the iconic Care Bear belly badges—onto your nails.
- Finish with a quick-dry top coat to seal designs and avoid smudging.
Step-by-Step Tutorials
Beginners can follow tutorials on YouTube or apps like Nail Art Pro for guided practice. Many nail technicians also share free tips on social media. They break down complex patterns into manageable steps. For example, start by tracing designs on paper before transferring them to nails.
Common Pitfalls to Avoid
- Skipping base coat leads to staining or chipping.
- Rushing drying times causes smudges—wait 2–3 minutes between layers.
- Using brushes meant for acrylics instead of fine detail brushes.
“Patience is key. Even professionals practice 10 times before nailing a design,” says Sarah Lin, a certified nail technician with 8 years of experience.
Visit a nail salon for hands-on demos or to borrow tools for practice. Focus on consistency—small mistakes can be fixed with a toothpick and acetone. With practice, your designs will look as vibrant as those seen in salons!
Expert Tips for Achieving Perfect Cute Nail Designs
Getting cute nail art right takes more than just the right tools. It’s about mastering technique. Here are some expert tips to keep your designs looking fresh and polished. Let’s dive into how to perfect your nail art.
Pro Secrets for Long-Lasting Nail Art
Here are some pro tips to protect your designs:
- Always apply a base coat to seal nails before adding nail polish.
- Use quick-dry drops between nail polish coats to prevent smudging.
- Choose chip-resistant nail polish brands like OPI or Essie for durability.
- Finish with a glossy top coat to extend wear time.
Quick Fixes and Touch-Up Advice
Mistakes are common. Here’s how to fix them:
| Problem | Solution | Tip |
|---|---|---|
| Chipped edges | Use a nail polish touch-up pen | Match the shade exactly |
| Smudged details | Clean with acetone and a toothpick | Work in small strokes |
| Peeling nail polish | Buff lightly before reapplying | Always start with a clean surface |
For quick fixes, keep a travel-sized top coat and a detail brush handy. When fixing, avoid over-sanding. Less is more.
Conclusion: care bear nails
Care Bear Nails let you turn nails into colorful canvases of creativity. You can use OPI brushes and Essie gel polishes to create cute designs. Follow these nail tips to avoid mistakes and ensure long-lasting results.
Start with step-by-step tutorials, then try gradients or glitter accents. Sharing your work online connects you with fellow artists for inspiration and feedback.
Practice builds skill, so don’t fear imperfections. Use top coats for durability and always clean brushes properly. These nail tips guide you toward polished outcomes.
Whether creating minimalist patterns or detailed characters, every manicure is a chance to express your style. Embrace the process, refine techniques, and let your nails shine with confidence.
FAQ: care bear nails
What are Care Bear Nails?
Care Bear Nails are fun and colorful nail designs inspired by the Care Bears. They often have bear faces, cartoon hearts, and bright pastel colors. This makes them a great way to show off your personality through your nails.
How can I create Care Bear inspired nails at home?
To make Care Bear nails at home, you’ll need nail polish, dotting tools, and brushes. Look for step-by-step tutorials online to learn how to paint characters and add cute designs. Remember, practice is key, so don’t be afraid to try different colors and patterns.
What are some popular colors for Care Bear Nails?
Popular colors for Care Bear Nails include soft pink, baby blue, lavender, mint green, and sunny yellow. These colors match the Care Bears’ iconic look, helping you get that adorable nail design.
What tools do I need for beginner-friendly nail art?
For easy nail art, you’ll need a good base coat, your favorite colors of nail polish, a top coat, a nail art brush, and dotting tools. These tools will help you create beautiful nail art without much effort.
How do I prevent my nail art from chipping?
To stop chipping, start with a base coat, apply thin layers of polish, and finish with a strong top coat. Also, avoid using your nails as tools and keep your hands and nails moisturized for extra strength.
What are some common mistakes to avoid when doing nail art?
Mistakes include using thick polish, skipping base and top coats, and not letting each layer dry. For the best results, work slowly, use thin coats, and make sure each layer is dry before moving on.
Where can I find inspiration for my Care Bear Nails?
You can find inspiration for Care Bear Nails on Instagram and Pinterest. Many nail artists share their designs there. You can also check out nail art blogs and videos for new ideas and step-by-step guides.
Can I get Care Bear Nails at a nail salon?
Yes, many nail salons offer custom nail art services. Just talk to your nail technician about Care Bear designs, and they’ll help you get the look with their tools and polish.