

“Simplicity is the ultimate sophistication.”—Coco Chanel’s timeless words echo the elegance of monochrome designs. black and white colour nail art combines classic style with modern creativity. It turns fingertips into canvases of polished artistry.
This guide breaks down the process into seven precise steps. Each step ensures every stroke and detail shines. Whether you’re a beginner or a beauty enthusiast, mastering this chic trend starts with understanding the balance of contrast and precision.
Table of Contents: black and white colour nail art
Key Takeaways: black and white colour nail art
- Follow a 7-step system for flawless black and white nail art.
- Essential tools and prep steps ensure even application.
- Minimalist patterns can make bold statements without complexity.
- Pro techniques keep designs sophisticated and long-lasting.
- Adaptable for any occasion, from casual to formal events.
Introduction to Monochrome Nail Art Trends
Monochrome nail designs have been popular for a long time. They mix simplicity with style. You can choose from classic black and white or modern minimalist looks. These designs are perfect for any occasion, from a chic evening to a casual day.
The Timeless Appeal of Black and White Designs
Black and white nail designs are loved for their versatility. They work well for any event. You can use bold patterns or subtle gradients to create a unique look.
This versatility makes them a favorite in fashion and everyday beauty. They are always in style.
Exploring Monochrome Nail Designs and Chic Nail Art Ideas
Monochrome nail designs offer endless creativity. Here are some bold ideas to try:
- Stripes: Vertical or diagonal lines for a retro vibe.
- Geometric patterns: Triangles or chevrons for modern flair.
- Minimalist polka dots: Playful accents that never go out of style.
Monochrome designs let you play with shapes and sizes. Try different finishes like glossy or matte to add elegance.
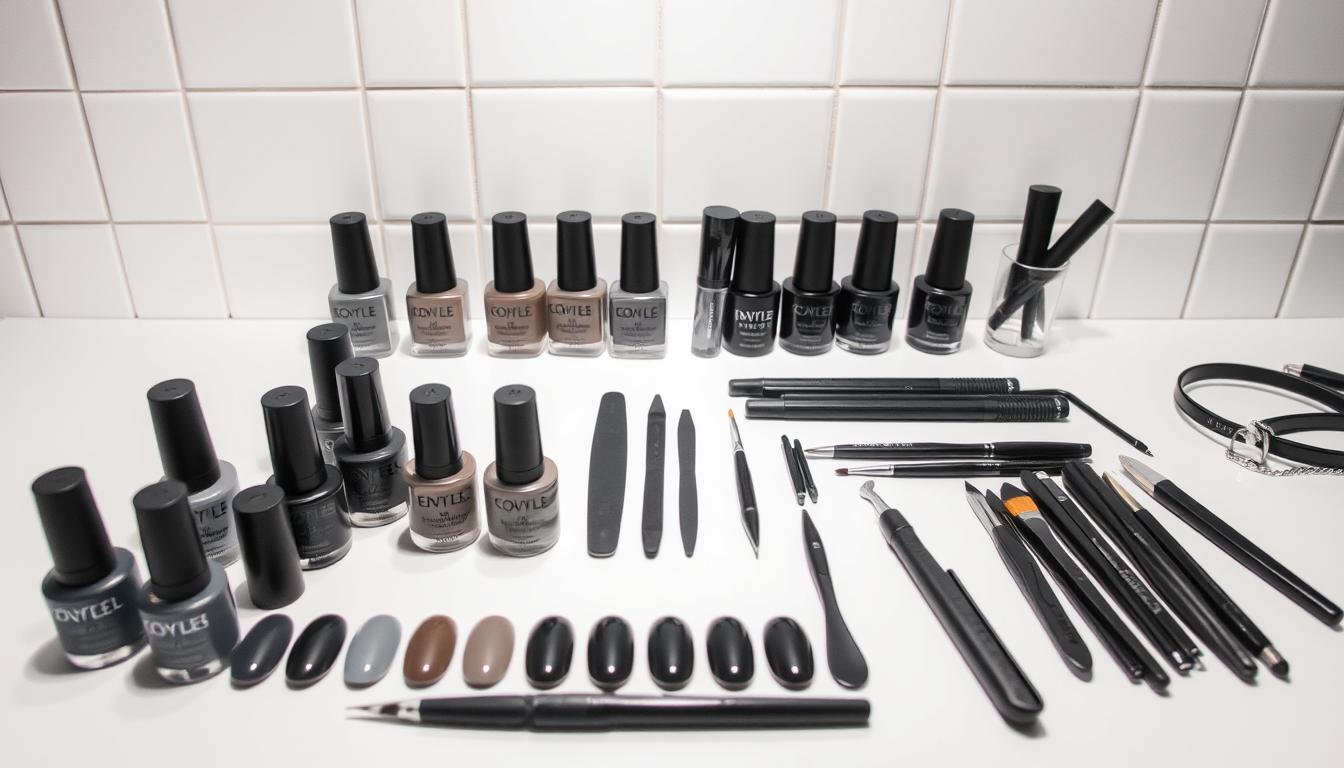
Essential Tools and Preparation Techniques
Mastering grayscale nail trends begins with the right tools and prep. Good prep keeps your designs looking sharp and bright. Here’s what you need to get started.
Tools to Gather:
- Black and white nail polish (e.g., Essie’s “Studio White” and OPI’s “Jet Black”)
- Small detail brushes (like the Konad Mini Brush Set)
- Dotting tools for precision
- Nail file and buffer
- Base coat and top coat (try Seche Vite Dry Fast Top Coat)
- Clean nails with acetone-free polish remover to remove oils.
- File nails into your desired shape, then buff the surface lightly.
- Apply a thick base coat to seal the nail and create a smooth canvas.
| Tool | Purpose | Example Brand |
|---|---|---|
| Base Coat | Protects nails and enhances polish adhesion | Zoya S.O.S. Base Coat |
| Detail Brushes | For intricate lines and patterns | China Glaze Detail Brushes |
Pro tip: Always test colors on a small area first. Quality tools and prep work together to turn grayscale nail trends into polished masterpieces. Prep isn’t just a step—it’s the foundation of your art.
Step-by-Step Guide for Creating black and white colour nail art
Turn your nails into a canvas of sophistication with these steps. Follow each phase carefully. This will help you create chic nail art ideas that impress.
Applying the Base and Primer
- Clean nails with acetone-free polish remover to remove oils.
- Apply a clear base coat to protect nails and ensure polish adheres evenly.
- Let dry completely before moving to the next step.
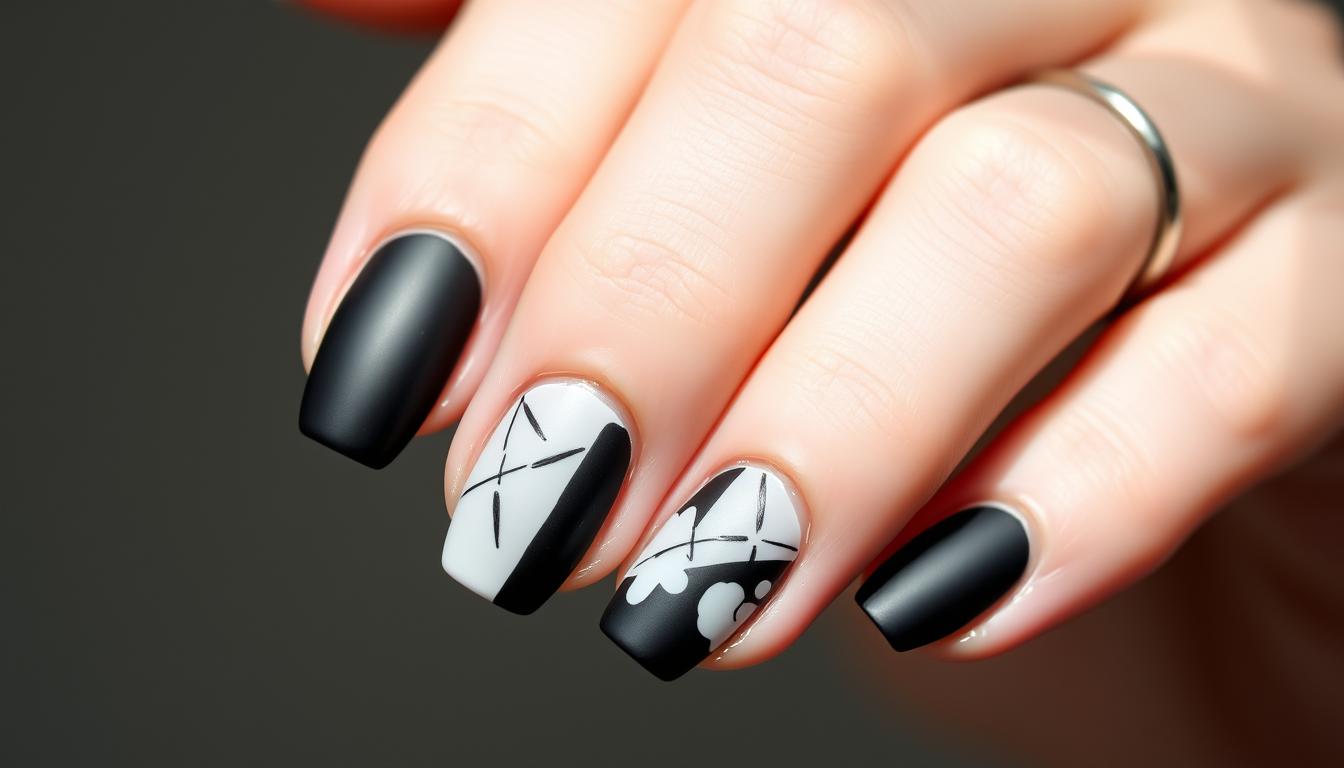
Mastering the Main Design Application
Choose a design that balances boldness and simplicity. Try geometric patterns or stripes using fine-tipped brushes. For minimalist chic nail art ideas, use washi tape to create crisp lines. Experiment with:
- Dotwork with black and white polka dots
- Negative space triangles
- Checkerboard grids
Finishing with a Top Coat for a Flawless Look
Seal your design with a glossy top coat. Cure under an LED lamp for 60 seconds or let air-dry for 10 minutes. Buff lightly with a fine polish pad for a professional finish.
Creative Variations for Elegant Manicures
Explore new ways to make your black and white nail art stand out. Add a touch of elegance by combining simple and detailed designs. This mix creates a unique look that shows off your style while staying cohesive.
Mixing Minimalist and Intricate Patterns
Match clean lines with delicate details. Try geometric shapes on one hand and tiny polka dots on the other. For a striking contrast, surround simple stripes with detailed lace. Essie has brushes that help with precise designs.
Bringing in Trendy Nail Art Styles
Blend timeless monochrome with today’s trends. Try out:
- Marbled gradients using nail art tape
- 3D effects with acrylic paint for textured accents
- Ombre fades blending black to white smoothly
Sally Hansen tools make gradient transitions easy. Mix stamping and freehand painting for added depth. Let elegant nail art inspiration lead your choices, whether you like subtle elegance or bold statements.
Experiment with size: use big patterns on thumb nails and tiny details on smaller ones. These changes keep your monochrome manicures fresh and unique.
Expert Tips and Troubleshooting for Chic Nail Art
Getting good at trendy nail art takes time and focus. Even pros struggle with issues like uneven lines or designs that wear off too soon. Here are some tips to improve your skills and make your nail art last longer.
Overcoming Common Pitfalls in Grayscale Nail Trends
- Uneven base coats: Use two thin layers instead of one thick one. Lightly buff your nails with a buffer block to help the polish stick better.
- Smudged details: For sharp lines, use tape barriers. Let each color dry for 2-3 minutes before adding the next layer.
- Peeling edges: Clean your cuticles with cotton pads soaked in a remover that doesn’t have acetone. Seal the edges with a clear base coat.
Advice for Maintaining Classic Nail Art Designs
Here’s how to keep your manicure looking great for longer:
- Use a chip-resistant top coat like Seche Vite Dry Fast Top Coat to make your nails last longer.
- Stay away from products with acetone. Use hand sanitizer instead of regular soap when washing your hands.
- Fix chips right away with a fine-tipped brush and the same polish color.
Try these tips with trendy nail art styles like ombré gradients or abstract splatter effects. Small changes can turn small mistakes into unique features, keeping your nails looking sharp.
Incorporating Seasonal Grayscale Nail Trends
Seasonal changes are great for updating your nail art. From winter’s cool patterns to summer’s bright contrasts, changing your look keeps your nails stylish. Here’s how to add seasonal flair to classic elegance.
Adapting Your Look with Elegant Nail Art Inspiration
Let the season’s mood guide your nail art:
- Winter: Add icy textures like frosty glitter or minimalist geometric grids.
- Spring: Use dainty floral etchings or gradient transitions from black to white.
- Summer: Try tropical leaves or stripe patterns with glossy finishes.
- Fall: Opt for marbled effects or autumnal leaf outlines in stark contrast.
Exploring Sophisticated Nail Art Techniques for Different Occasions
Match your classic nail art designs with the right techniques for any event:
- Formal Events: Delicate lace patterns or damask details using fine liners.
- Casual Days: Bold checkerboard grids or simple dots for effortless style.
- Holidays: Add metallic accents to stripes or create layered snowflake designs.
“Seasonal twists on classic black-and-white nails are a canvas for creativity without losing their timeless foundation.” — Nail Masters Journal
Trying out seasonal themes lets you enjoy trends while keeping your nails elegant. Mix textures, patterns, and finishes to fit your style and the occasion.
Conclusion: black and white colour nail art
By following these steps, you now know how to make bold, timeless designs with black and white nail art. You’ve learned about the right tools and how to apply them with precision. Each step leads to a polished finish.
Remember, even small changes can make a big difference. They can turn simple manicures into eye-catching looks.
Trying out new nail art techniques can lead to endless creativity. You can play with geometric shapes or keep it simple with minimalist designs. This way, your nails stay trendy and show off your personal style.
Adding seasonal themes or special event touches can also make your look unique. This lets you keep your style fresh without getting too complicated.
Don’t forget to go back to tips on fixing mistakes or keeping your nails looking good longer. Every time you do your nails, you can get better at it. Exploring new patterns, like gradients or stripes, can make simple designs look amazing.
Black and white isn’t just colors; it’s a way to show confidence through your nails. It’s a chance to express yourself in a unique way.
Monochrome trends are very flexible. You can wear them for a casual day or a fancy event. Keep practicing, and your nail art will become a special part of you. It will be elegant and uniquely yours.
FAQ: black and white colour nail art
What are some popular styles for black and white colour nail art?
Popular styles include minimalist designs and geometric patterns. Classic French tips in black and white are also trendy. You can also try intricate art that combines different techniques for a chic look.
How can I maintain the longevity of my monochrome nail designs?
Start with a strong base coat to keep your nails looking good. Avoid using your nails as tools. Apply a quality top coat regularly to protect the art.
Regular maintenance and gentle cleaning will also help. This way, your nails will stay elegant.
What tools do I need for creating sophisticated black and white nail art?
You’ll need a good quality base coat and black and white nail polish. Nail art brushes, dotting tools, and a top coat are also essential. These tools help you create both simple and intricate designs.
How do I incorporate seasonal trends into my black and white nail art?
Add seasonal trends by using matte finishes or glitter accents. For winter, try snowflake patterns in black and white. This adds a touch of classic elegance.
What are some troubleshooting tips for common issues in grayscale nail art?
If you see bubbling or uneven application, make sure your base coat is dry. Use thin layers of polish and let each layer dry completely. This prevents smudging and gives a flawless look.
Can you suggest elegant nail art inspirations using monochrome designs?
Try a matte black base with glossy white stripes or spotted designs. Negative space designs or simple polka dots are also great. They keep the classic appeal while allowing for creativity.
